Above is the fresh water fill. This orifice accepts a narrow diameter water hose for filling the fresh water storage tank. Since it is narrow it is designed with a vent immediately next to it so that it won't pressurize the tank and expand it, possibly damaging surrounding structures. Be sure to fill slowly and allow the port to "breathe." You can fill until the water exits the vent. It has a lockable cover.
This is the shore power hook-up for 120 volt power. It is a twist lock connector and has three conductors. It is rated for 30 amps and Northwood provides a 20 foot, heavy gauge cord with the camper. This will power the interior and exterior outlets, air conditioner and microwave, along with providing power to the 12 volt converter. Note that the interior 120v outlets, A/C, and MW do not work off the 12v system by itself. This is also a way to continually keep the battery system maintained when not in use. I keep it plugged in at home.
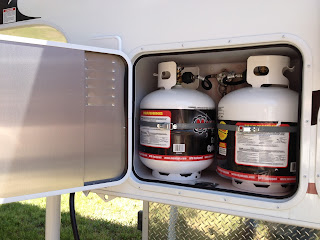
The 840 has two 20 lb. tanks stored upright in their own compartment. It is vented to the outside and has an unlockable door. This is code I believe. They are regular tanks that can be replaced or filled at any convenient location. No weird tanks that have to be certified or filled by special dealers. The door is about 2/3 insulated and there appears to plenty of room to extract the tanks.
This is the propane control valve that switches the tanks automatically when one is emptied. I still haven't figured out how to read it properly. The compartment is sealed from the interior and is pretty simple.
Our camper came with one battery located in an outside accessible compartment. It is a box that is sealed off from the interior also. There is room to fit two batteries and I will be sticking another one in there asap. The compartment also has two wires that are part of the pre-wired solar panel hook up. The dealer made me a jumper for a second battery for free. Not sure I want to keep this lead acid battery but we'll see. Would rather have a matched pair of 6 volt deep cycles. This box has a vented door that locks.
This is the control interface and venting for the hot water heater. There is a drain at the bottom, a gas jet, and an electrical control too. This thing will work on either gas or shore power. If you are getting your camper out for the first time or just after filling the water, flip the pop off valve a bit to make sure it is full of water before heating or you may burn the element out. In order to use the electric side there is a switch at the lower left corner that must be turned on for it to work. Be sure to open the interior bypass valve too. It's under the sink. Basic stuff for any RV'er but it was all new to me!
The "City Water" connection. It is where you can hook up a hose that already has water pressure from the campground or wherever. There is a check valve to prevent water from going into the fresh water tank but you also need to get a pressure regulator from an RV dealer to prevent weird high pressures form somewhere else from blowing out your camper's pipes. Why they don't just incorporate one into the design or furnish one is beyond me. They are really cheap at less than $10 if you shop smart.
Be careful attaching your hose. The plastic fitting feels robust but could easily get cross threaded.
Satellite and other video hook ups. Nuff said.
The gray and black water drain is located under the driver side rear apron and has an access door for it from the camper rear wall. Great placement and easy to deal with. Works well and is sealed up tight.
Above the septic drain I found this wire harness that leads over to the right rear tail light assembly. As it makes the turn at the top there are a couple of wires that divert into the camper and the opening is not sealed. This is a place where water and debris from the tires is kicked up so I am suprised this was ignored. I will fix!
There are about three places on the underside of the camper where there are penetrations that are covered by this plastic corrugated material. They are not always sealed. I will fix these too. This one is the gas line starboard amidships.
This is the outside shower port. Has its own door and must have the included hose and sprayer connected before use. Pretty neat -- you either love 'em or hate 'em.
This is a shot of the side where the previous pics were taken. You might be able to pick out all the openings from this angle.
So that is all I have time for right now. More pics have been taken and more critique to follow so stay tuned to the obsessive TC channel! TTFN...


No comments:
Post a Comment